What are Modules in Canvas?
The Modules tool allows instructors to organize content and control the flow of the course by creating a one-directional, linear list of what you would like your students to do. Modules can be used to organize course content by weeks, units, or a different organizational structure, and can include assignments, content, tests and quizzes, files, discussions, and pages.
Please note: If you are using the Fox Online Canvas Template for your course, it is not recommended to also organize content in Modules. For more information on this, please contact foxonline@temple.edu to get connected with an instructional designer.
Benefits:
Modules are especially useful for learning materials that are best covered in a set sequence by providing logical order and easy navigation. Student prerequisites or course progress can be tracked with a sequence in a Module.
When you add requirements to a module, students must complete all requirements within one module before moving to the next module. You can require students to complete all requirements in the module, or have them choose one item to fulfill a specific requirement.
Best Practices Recommendations:
- Create Modules by week or by unit/topic to organize all course content
- Add or link to all Assignments, Pages, Files, or Discussions for that week/unit from within a Module
- Sequentially order content within each Module according to how the student will access content
- Add text within the module with action verbs and due dates to clarify what is due when
- Publish Modules or set available date
Where to start?
When you create a new course shell, the Home page will automatically be set to Modules. You can just select the "+ Module" button to get started.
- Once you have named your module, you can select the + button on the right of that module to add content to it.
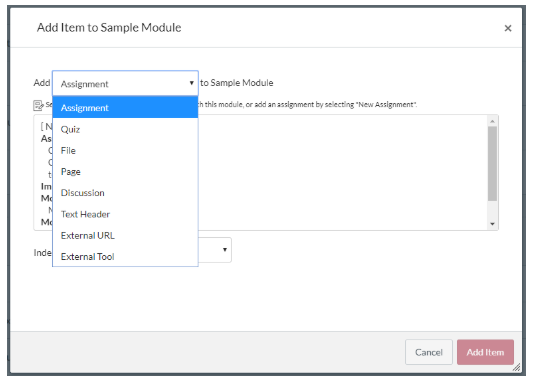
- You will be prompted to choose from a dropdown list of options from the content already inside your course to external URLs and tools.

- Select the type of content you want to link. If you choose assignment, quiz, file, page, or discussion you will be shown a list of everything you have already put in the course to choose from, or you will have the option to create a new item of that type. You can then
choose whether or not you would like to indent that item, and add it to your module. - If you choose to add a text header you will be prompted to enter the text, which will then be added to the module and can be moved wherever you would like in the list of module items.
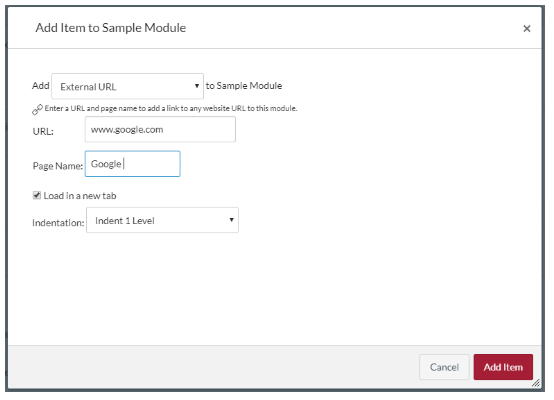
- If you choose External URL, you will be prompted to add the URL for the website you would like to add a link to, along with the title for the link and whether or not you would like it to open in a new window. The link will then be added to your module.

- If you select External Tool you will be prompted to choose from a list of available integrations within Canvas, which will provide a link to the integration.
- Once you are done adding your desired content, you can rearrange as you wish by dragging and dropping each item into the preferred order.
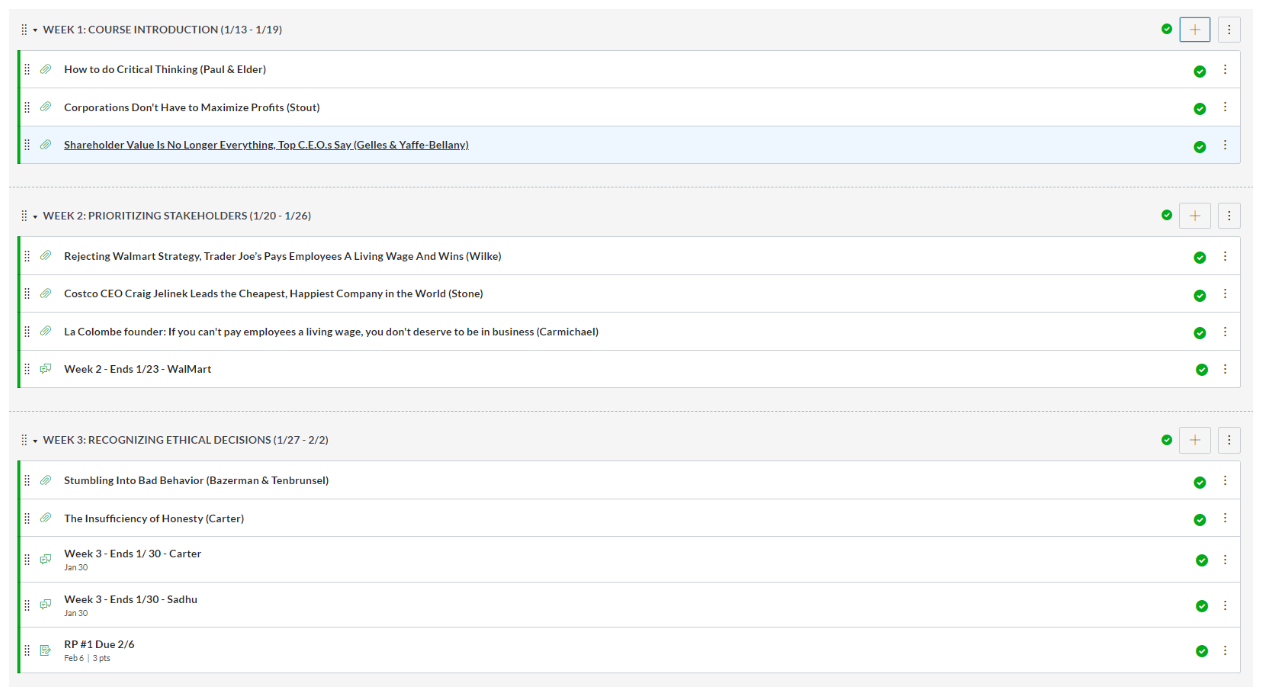
Basic Modules Setup Example:

Using Modules
You can use modules to organize and display all of the content for your course. Below is an overview of what modules are and some strategies on how to use modules:
- Modules are a way to organize your course by weeks, units, chapters, topics or whatever organizational structure works best for your course. With modules, you create a one-directional linear flow of what you would like your students to do.
- Each module can contain files, links, discussions, assignments, quizzes, and any other learning materials that you would like to use. You can easily add items to a module that you have already created in the course and you can also create new items on the fly within the module by clicking the + icon inside of each module.
- Modules can easily be reordered to fit the flow of the course by simply dragging and dropping. Elements within the modules can also be reorganized by dragging and dropping.
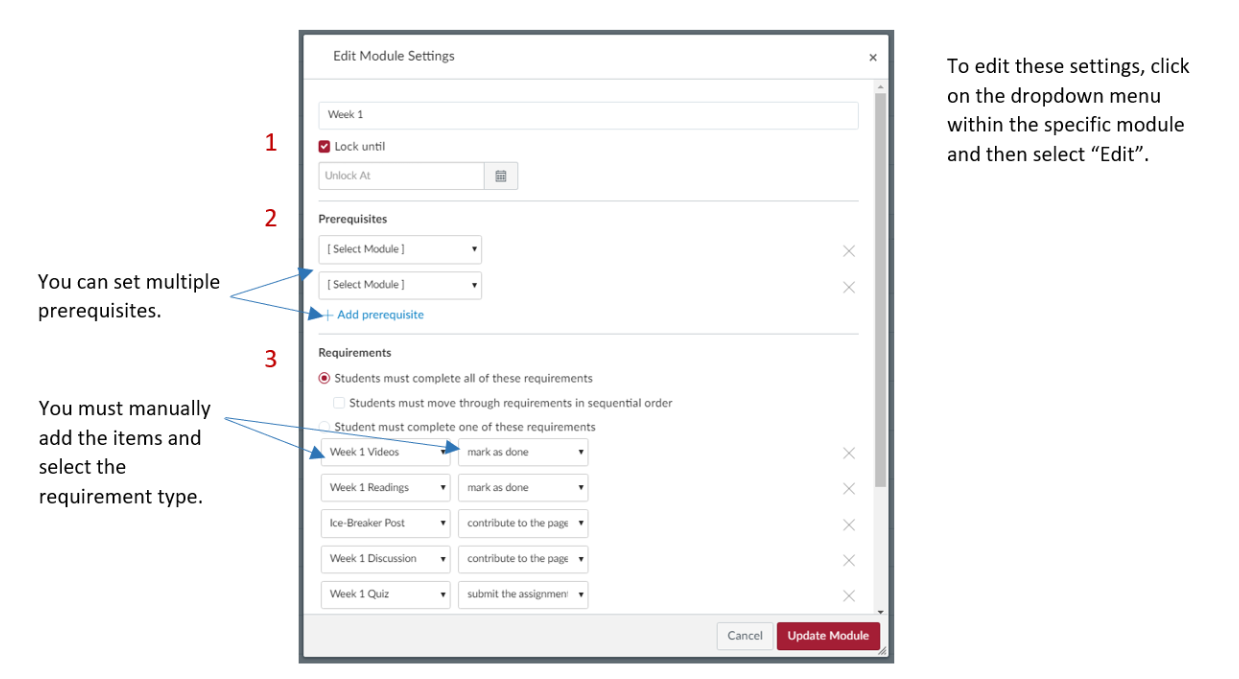
- Modules can be released on specific dates (1). If a module is set to release on a specific date, students will be able to see a list of module contents, but the list will be grayed out and items will remain inaccessible until the release date. You can also create prerequisites (e.g. a module cannot be accessed until a previous module has been completed) (2). You can set the elements within the module as “requirements” so that students must follow through with the task in order for it to be marked as complete within the module list (similar to a checklist) (3). Requirements are used to guide the students, but their grade is still up to them doing the work. Whether or not they “mark as done” or “submit an assignment” does not have any point value. The only obvious influence on the grade is when the student does not complete the task.

If my course uses a Pages template, how can I incorporate Modules?
While pages are a great way to design your course, modules can still be used to help supplement your course content. If you have additional resources for your course that don't make sense to link on every weekly page, you can create a module to house whatever documents, links, rubrics, informational pages, or extra content you think need to be available to students during the course which may not fit directly into a weekly to-do list. If you like to add the occasional recommended reading or interesting video for students to check out, a module for additional content would be the perfect place to provide the class with that information.
You will have to make sure that Modules is visible in your course navigation menu so that students can access your content. Then you can get creative and create a module for whatever you need. Content or assignments you link can easily be unpublished if you don't want them to be available until a specific time, or if you would like to use modules as a resource for your own organization and do not wish to make it available to students that is also an option.