* Please note, it is unauthorized and against current Fox/STHM policy to allow students to join your scheduled Zoom session if you are teaching an in-person class (non-hybrid or virtual). The Zoom sessions scheduled for your class are intended for class recordings only.
- In-person class recordings will be made through Zoom. Below are instructions that will walk you through setting up your sessions for the semester, connecting to Zoom in your classroom, and posting your recordings to Canvas.
- Prior to the class, instructors must obtain written permission from guest speakers (internal and external), allowing the Zoom session to be recorded and shared.
- Zoom cloud recordings will be automatically deleted after 120 days
Classroom Podium Controls

- Select "PC" if you are using the podium PC
- Select "Laptop" if you are using a laptop
The options under "Select Video for Web Applications" allows you to select which video source you wish to act as the camera in Zoom.
- Press "Front Camera" if you want the Zoom participants to see the students in the room.
- Press "Rear Camera" if you want the Zoom participants to see the presenters at the podium.
Laptop Users Please note that you will need to plug TWO cables into your laptop:
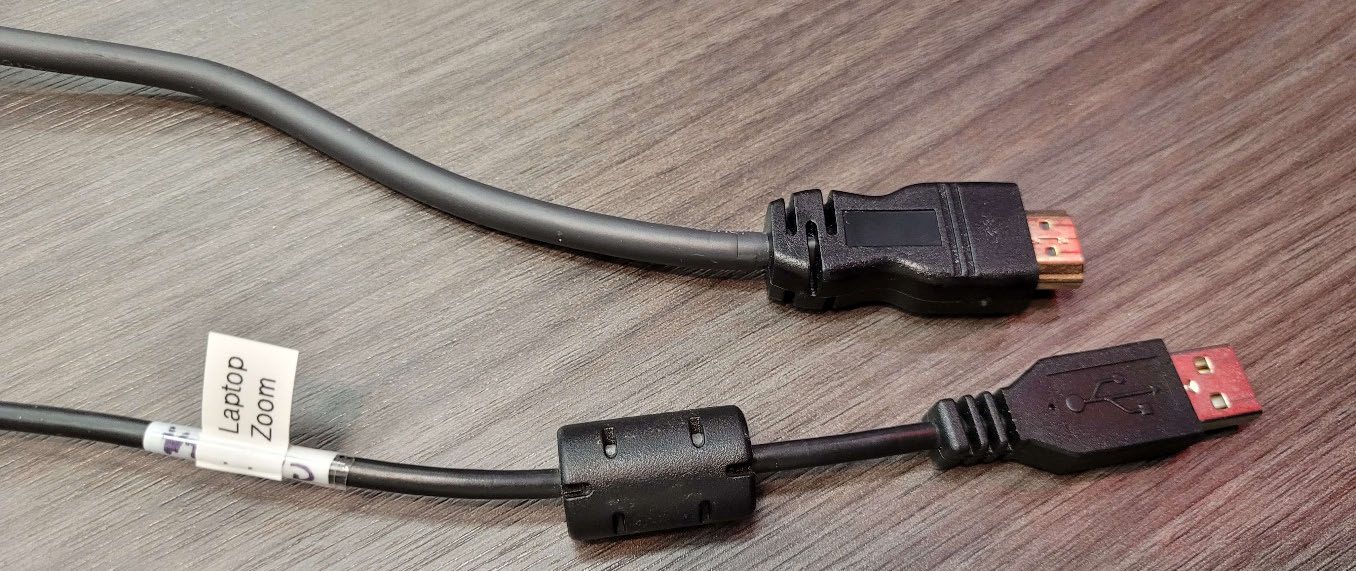
- The HDMI cable is needed to display your laptop on the projectors.
- The USB cable marked LAPTOP ZOOM is needed if you wish to run Zoom on your laptop.
It is highly recommended that you be prepared to run the Zoom Meeng on the Podium PC, if there are any issues with your Laptop.
Using Zoom from the Classroom Podium
- Open either the Zoom desktop application or the browser application at https://zoom.temple.edu
- Find your meeting for today’s class in your Upcoming Meetings list, or Schedule a Meeting.
- Once you have launched the meeting, you will be prompted to Join with Computer Audio or Test Speaker and Microphone
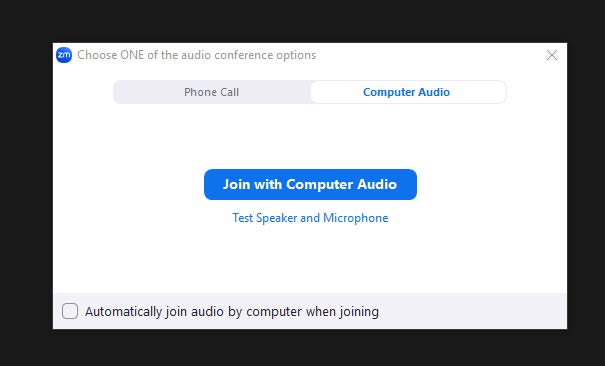
- Select "Test Speaker and Microphone"
- The correct Speaker should be the option marked as HDMI
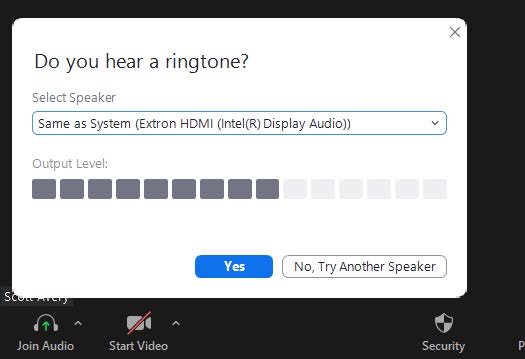
- Each room has slightly different hardware. It will not always be an Extron HDMI
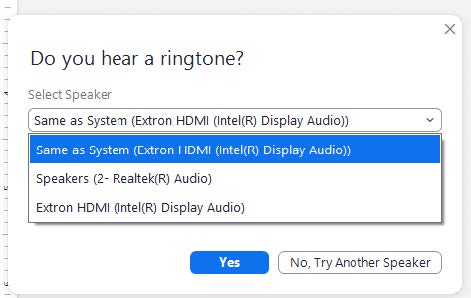
- Confirm that you can hear the ringtone over the classroom speakers and click "Yes"
- You may need to adjust the Speaker Volume on the touch panel and make sure the speakers are not muted.
- Each room has slightly different hardware. It will not always be an Extron HDMI
- The correct Microphone is AV Bridge
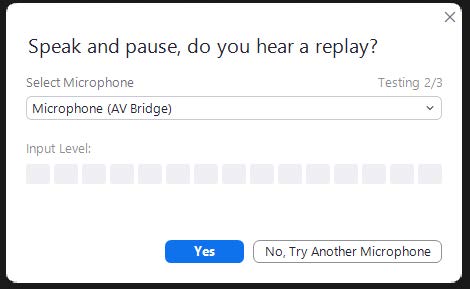
- If you cannot find AV Bridge in the list of options, double check that you have selected the correct "PC to Use" in the "Zoom Controls" on the touch panel
- Confirm that you can hear your voice over the classroom speakers and click "Yes"
- You may need to adjust the Microphone Volume on the touch panel and make sure the mics are not muted.
- The correct Speaker should be the option marked as HDMI
- If you clicked "Join with Computer Audio" without testing the microphones, there is a second way to ensure you are using the AV Bridge:
- Click on the small carrot (^) next to the "Mute/Unmute" button on the lower left side of the Zoom application.
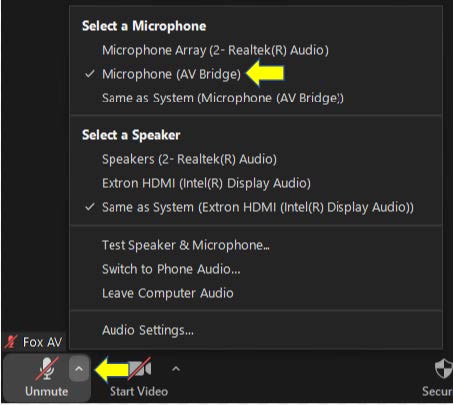
- Click on the small carrot (^) next to the "Mute/Unmute" button on the lower left side of the Zoom application.
- Select "Test Speaker and Microphone"
- Once you have joined your meeting, and checked your microphone and speakers, you will want to check your camera.
- Just like the Microphones/Speakers, click on the small carrot (^) next to the "Start Video" button on the lower left side of the Zoom application.
- The correct camera is always named "AV Bridge"

- Finally, once you are sure you have selected everything correctly, be sure that you are unmuted and you have started your video.
- If you need to pause or stop your recording, at any time, the recording controls are on the top left side of the Zoom application.

- You may also use hotkeys: "Alt+P" for pause and "Alt+C" for stop
Scheduling Sessions on the Zoom Website
- Go to https://zoom.temple.edu
- Login with Accessnet username and password
- Select "Meetings" on your Zoom navigation (to the left)

- Topic: Enter a topic or name for your meeting
- Description (Optional)
- When: Select a date and start time for your meeting
- Duration: Choose the approximate duration of the meeting
- This is only for scheduling purposes, the meeting will not end after this length of time
- Select "Recurring meeting:"
- Recurrence: Change from Daily to Weekly
- Repeat: Keep this on "1 week"
- Occurs on: Select the day(s) of the week your class occurs on
- End Date: Enter your last class date OR select the number of weeks your class will run
- Registration: Check the "Required" box
- Template: Uploading a meeting template is optional
- Security: The security options are based upon preference

- Video: Both Host & Participant videos are set to off by default
- This means videos will be off until the Host/Participant they are ready to turn them on
- Audio: Keep on "Both"
- Meeting Options (optional)
- Recommended: “Mute participants upon entry” * Automatically record meeting

- Recommended: “Mute participants upon entry” * Automatically record meeting
- Select "Save"
Launching your Session & Connecting Audio
- Go to https://zoom.temple.edu
- Login with Accessnet username and password
- Select "Meetings" on your Zoom navigation (to the left)
- Hover your mouse over your upcoming meeting and select "Start"

After you have selected start, a pop-up window will appear asking if you would like to open the Zoom Meeting
- Select "Open Zoom Meetings"
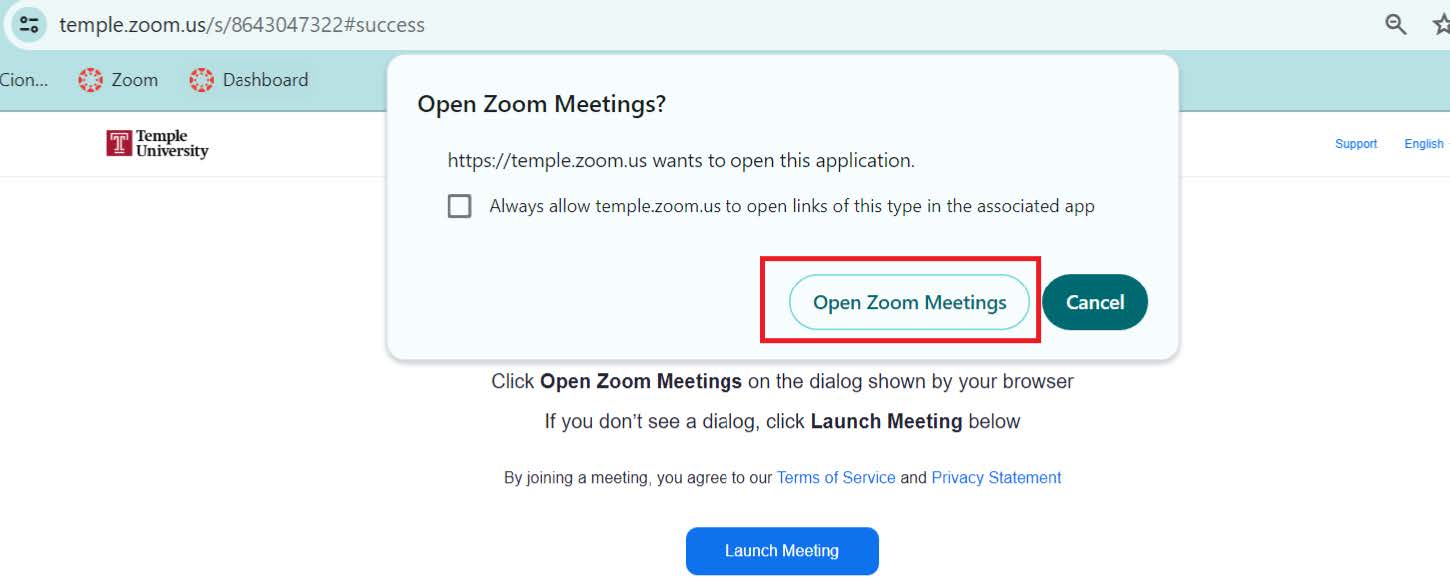
- Once you have connected to your session, a pop-up window will appear for to connect your audio
- Select "Join with Computer Audio"
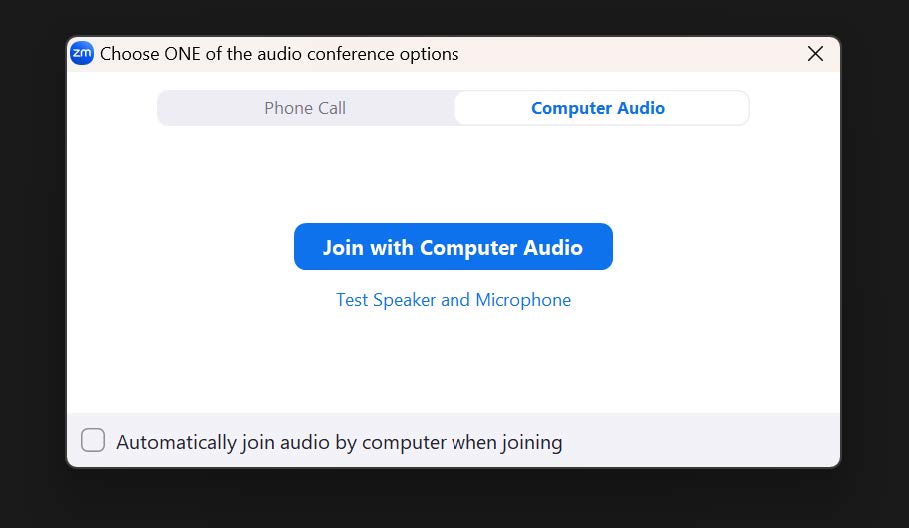
- Select "Join with Computer Audio"
- On the Zoom navigation bar (at the bottom of the window) make sure you are unmuted and your video is on

- If you did not schedule your session to automatically record to the cloud, select "Record"
- To stop your recording, select the stop or pause button on the Zoom nav bar

* Your recording will automatically stop when you have closed your session
Posting Class Recordings in Canvas
Option 1: From your email
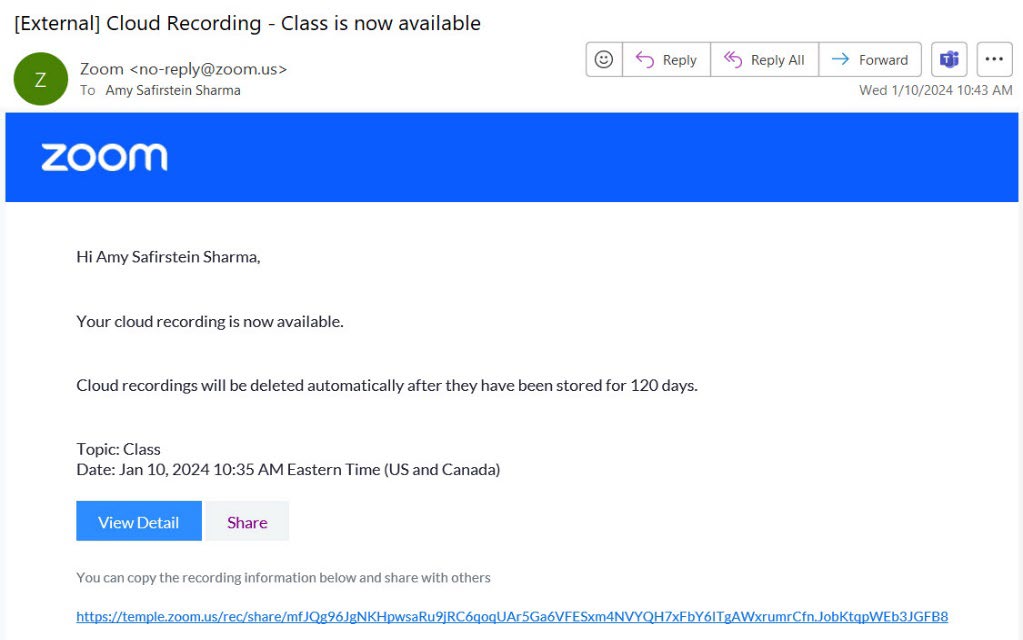
- When your recording is available, you will be emailed the recording link
- Highlight the link and copy/paste to Canvas
Option 2: From the Zoom website
- Navigate to https://zoom.temple.edu
- Select "Recordings" from the column on the left
- Enter the class Meeting ID or select Advanced Search to find your recording using a date range
- Navigate to the page in your Canvas course where you plan to share the recording
- Select "Edit" in the top right corner
- Paste the full link or highlight the text that you want to add the hyperlink to and select the icon above the text box that looks like a chain link to paste the text as a hyperlink
- Select "Save" in the bottom right corner and test the link to ensure there are no spaces or errors
* Please note, faculty who are notified that they have students with DRS accommodations (that allow for a student to have a note taker) should record their Zoom class sessions. The recording link can be sent individually to the student(s) via email when available.
Contact foxzoom@temple.edu with any questions